Forgot Login?   Sign up  
Sunday, January 19, 2025

Member Blogs

Kitbashing a Micron Arts 1083 Pratt Truss Dual Mainline Bridge


It’s not that I’m so old. It’s just that there are traditions that are important. And one tradition, at least to me, is to fabricate as much as possible. I don’t like buying ready-to-run models. I prefer to build them.


Moreover, I love bridges. Being a devotee of John Allen’s Gorre and Daphetid, where he created over 100 bridges, any layout I create would have at least a few. And while I’m not opposed to building them using structural plastics if that’s what I have, I prefer metal. I can’t say why, but there is just a look and feel to metal (although I’m mightily impressed with some recent 3D printing being done by SouthernNScale, I must admit).


So when I started looking around the Z landscape, I found Micron Arts and their various bridge kits in etched brass. Perfect! True, I spent a lot more for the kits than I could have had I purchased a plastic assembly, but the fun is in the building.


Problem is my first Z layout has a dual mainline, whereas the Micron Arts kits are all single-track. But that’s not really a problem if one is willing to spend twice as much, take a risk and a leap of faith, and kitbash two single-track kits and transform them into a single, double-wide bridge. And that’s what I’ve done here.


In fairness I did assemble a kit as it’s supposed to be assembled, following the directions and producing the single-track version. I was more interested in seeing how it went together and if I would hit any roadblocks along the way. I found the kit easy to assemble, but I’ve been doing this awhile. For a beginner, take your time and make sure everything is fitting as it should! And since I lay my own track, I’m comfortable with soldering. I can’t imagine gluing a brass bridge together, but apparently you can according to the instructions. Here, I soldered, and I’m not entirely sure you could build this double-wide version using CA (cyano-acrylate, or “super glue”). Maybe epoxy, but soldering seemed the best option to me.


So first the big picture. My goal would be to use as much of the original kits as possible, keeping structural integrity and aesthetics in mind. Where I can’t use kit parts, I’ll prefer structural brass over other materials, in keeping with the spirit of the kit. I run my dual mainline track at 0.75” center-to-center, so all measurements will be based on that. The good news is half of 0.75” (3/4”) is 3/8”, so I don’t have odd measurements to deal with. I chose 3/4” because in HO scale, dual mainlines tend to run 2” apart. Doing some math, 2” in HO equates to 3/4" in Z.


Upon completion of the single-track version, I decided I would switch the order of assembly a bit. The order in which I assemble the chords (sides) isn’t relevant since they’re the same either way. But it’s very important to build the base correctly. The entire bridge depends on it. So I started with the base and essentially built the bridge from the ground up. That allowed me to get things aligned as well as create good solder joints along the track support girders. Once the base was entirely completed, then I created the chords and secured to the base. Finally I worked the top of the bridge.


From an instructional standpoint, I started with Step 5 of the instructions, completed Steps 6 and 7, then moved to Steps 1 through 4, finishing up with Steps 9 through 12. I skipped the final couple of steps. Those would have me secure the signage and end frames. I like the appearance of the bridge without those details, so I’ll leave them off.


So, let’s dig in. I first found the G1 gussets, which are the end gussets. G1 gussets have no tabs for securing the vertical support members. G2 and G3 have these tabs, with G3 gussets having longer tabs since there will be two diagonal supports instead of one. The longer tab is needed to go through the slots for all of the vertical and diagonal members. All gussets come as a flat piece which you’ll fold together to form a gusset twice as thick (Figure 1).


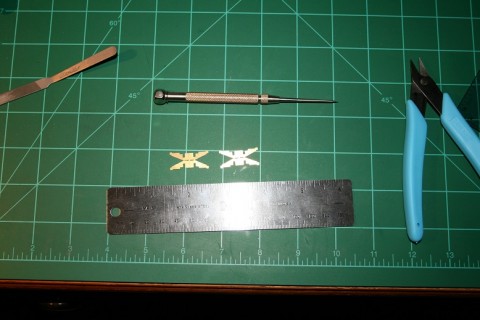
Using my ruler, I located the centerline on the back side of the gusset, the trimmed the end 3/8” away from center (Figure 2). Here you can see them butted against each other, forming the basis of the dual mainline configuration. To cut, I used Xuron sprue cutters (highly recommended).


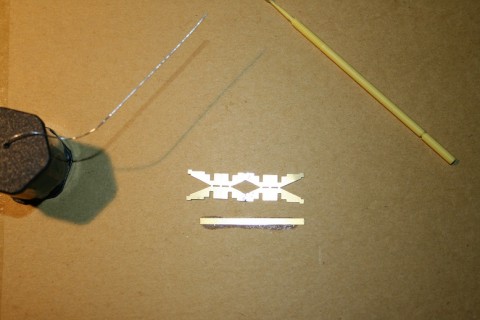
It’s one thing to make the cut, but it’s something else entirely to weld the gusset pieces together. They absolutely must be properly aligned and square, but the cut isn’t guaranteed to be perpendicular to the track. If I just soldered them together as I cut them, the finished gusset could be crooked and angled. Can’t have that! So to prevent this, I created a soldering jig, which I used throughout the build. The kit comes in a thick cardboard envelope, so on the backside of this I glued a piece of scrap brass to be used as a straight edge (Figure 3). I’ll hold the gussets against the straight edge and solder the brass side not touching the guide. I don’t want to weld the gusset to the guide! The envelope will absorb heat, and I’m assured I won’t also weld my gussets to the cardboard.


I made my weld to both sections of the gusset, spinning it around in the jig. Then I folded the gusset and welded the two pieces together to form the unit that fits into the lower cross brace (Figure 4). This is the same process you find in Step 5 of the instructions if you’re following along.


The gussets fit into a slot, or well, in the lower cross brace. Normally the brace would extend side to side (as I’ll show later on with the top bracing), but in this case I elected to trim the ends from both pieces based on measurements I’d taken. (Figure 5).


With one side trimmed, I soldered the two lower cross braces together such that the wells are perfectly fitted to the gussets (Figure 6). Looking down from the top of the bridge, the brace angles are for a single track unit and therefore not correct for a bridge twice as wide. An expert engineer would notice the structural oddity, but it’s not a detail casual observers would notice. I was more interested in preserving the wells in the brace than cross brace appearance since it’ll not be that noticeable once assembled.


With the lower cross brace assembly complete, it was time to solder in the gussets (Figure 7). Not being an expert photographer, I decided to photograph things on white paper, hoping the detail would show up better than it does on my green cutting mat. That’s why you’ll see the different background starting with Figure 7. While I’m assembling all of this, I’m constantly monitoring the track center-to-center measurements and overall width. I want the bridge to square up in the end, after all. Also, one of the lower cross braces is lower than the other since I soldered them together one atop the other. The side that’s lower must have the end be adjusted upwards a tad because the pin of the brace and the tab of the gusset must mate with the vertical support members. If I didn’t adjust them, they wouldn’t line up and I couldn’t secure the side of the bridge.


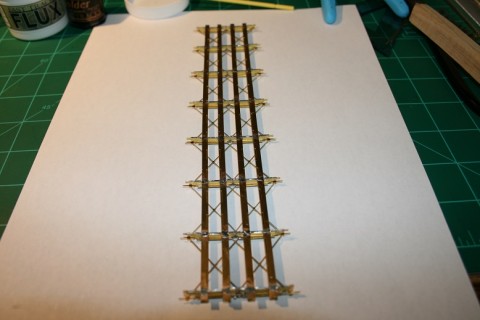
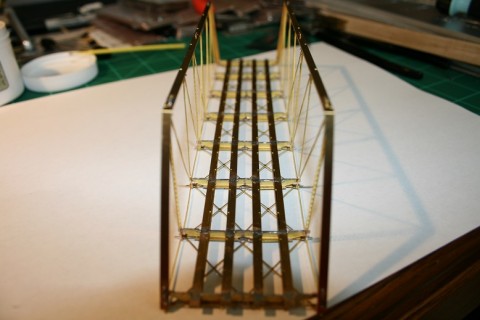
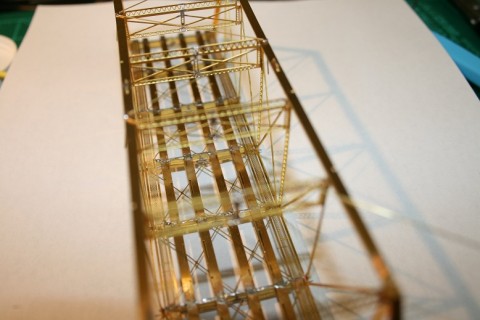
Now is the perfect time to lay in the track support girders (Figure 8). Looking at the image, to my eye the bridge appears slightly curved. Old eyes? But in actual fact it’s perfectly straight.


Similarly, the tie plates are easy to add at this point (Figure 9).


With the tie plates secured, the base is complete. It’s time to assemble the chords! Here, I followed the instructions starting from Step 1. The only thing I deferred was the addition of the top plate (kind of the kit’s Step Zero). I find it easier to trim the pins we’ll be working with (Figure 10) without the plate installed. Once the pins were trimmed, I added the chord plates.


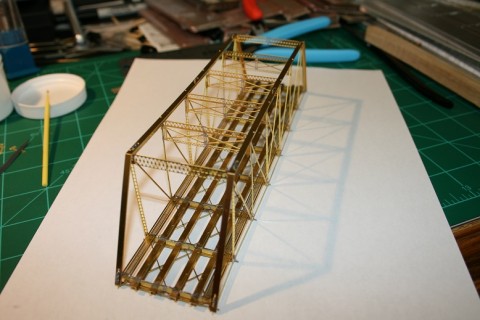
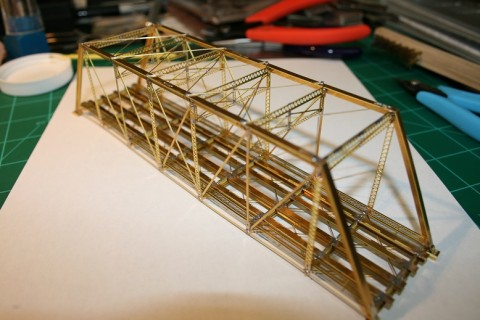
With both chords assembled, I carefully lined up the lower brace pins and gusset tabs, squared each side up, and soldered the sides according to the kit instructions. The completed unit so far is shown in Figures 11 and 12.


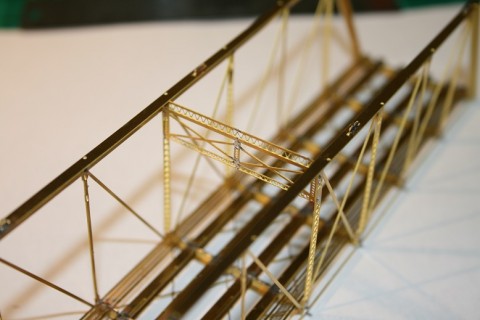
Everything to this point was pretty straight forward and relatively simple. And to be sure, we have the makings of our dual mainline bridge. The upper structures, however, will require some thought. I’d originally thought I’d cut the center cross braces from each upper sheer frame and then replace them with a slender, double-long piece I’d cut from brass plate. But looking at them I was a little concerned about damaging the outer frame itself, so I elected to try something different (Figure 13).


Here you can see that I trimmed the ends off of two sheer frames and soldered them together, similar to what I’d done for the base gussets. For the cross bracing, however, I trimmed one of the cut ends and used that as a vertical center support, soldering the cross braces to the center support. The angles aren’t quite as they should be, but I thought the overall effect was pretty cool. You can see the fine detail here, so I was careful with my cutting and splicing to as to not destroy the intricate design (see especially the upper banding).


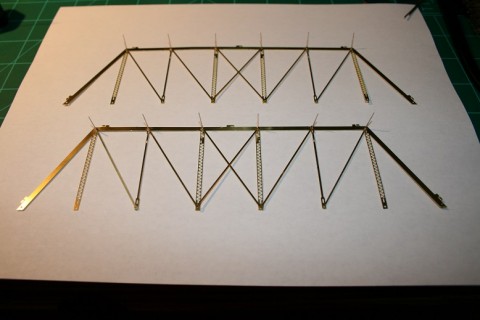
So four main sheer braces and two end braces later, I had what you see in Figure 14.


Somewhat surprisingly, the center sheer frames were actually quite sturdy. I think my redesign helped in that the joint line wasn’t entirely vertical along a plane. That is, the sheer frames didn’t flex in the center since the joint included the center vertical brace. However, the end frames certainly did seem to want to bend along my solder joint, so to the upper rear of the end frames I soldered a 1/32” square brass bar as a horizontal stiffener. It’s hardly noticeable, but it gives great support to the frame. Figure 15 provides another view.


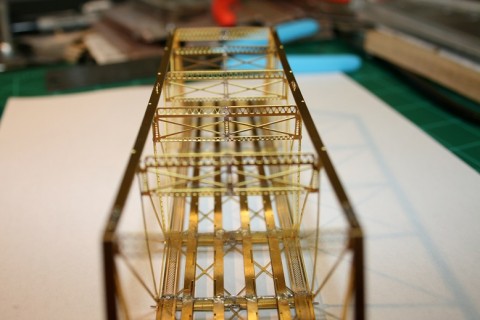
Now it was time for the upper ‘X’ cross brace. Here, I didn’t want to follow the approach I took with the lower brace. The lower brace had the gusset wells, but the upper brace is simply applied to the top of the chords. If I cut the ends off of the two existing kit pieces, it would look strange! But this is also easily solved with some 0.032” brass wire! It’s hard to see in Figure 16, but I’ve started weaving this wire along the top of the chords, soldering each joint as I go.


A slightly better image is Figure 17, where I’ve completed weaving the ‘X’ brace. Note I put a dab of solder where they meet to simulate a coupling plate. Figure 18 is a head-on view.


Now it’s all but completed. I added footers, as you can see from Figures 19 and 20. The structure squared up nicely and sits on a flat desktop with no rocking. At this point I’d put approximately 12 hours into the project, and taking my time, measuring frequently, and overall inspecting progress as I went has produced a nice piece, well capable of handling the traffic my little layout will throw at it!


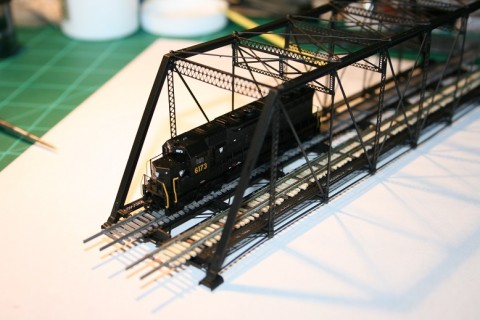
Of course, it’s beautiful as a brass piece, but the intention is to actually use it. That being the case, I bathed it (liberally) in lacquer thinner to clean the solder flux from all surfaces. I then primed it using Tamiya’s (fine) surface primer and painted with Testor’s flat black, keeping good painting techniques in mind. It would have been a shame to paint a bunch of non-scale drips and runs at this point! In Figures 21 and 22 you can see a more final result. I’ll need to build some more track…the left track has no guard rail and the right track’s guard rail didn’t yield enough flange clearance (still learning!), but you can see the effect is tremendous. Once I do create good track and get that painted and glued into place, as well as some structural weathering, it’ll make for a nice addition to my burgeoning layout.


Continue reading
Recent Comments
Walter Smith
Great job! Looks outstanding and looks like it was a lot of work getting all the parts together and looking as good as you have it... Read More
Saturday, 20 May 2017 23:04
Walter Smith
I haven't tried yet but, they do have several types of metal in which you could build a bridge! the biggest problems would be size... Read More
Saturday, 07 September 2019 01:51
Walter Smith
Well your work is outstanding I just finished the second bridge both are single track! Posted photos!
Thursday, 30 April 2020 18:26
  15824 Hits
  3 Comments

Hand-Laid Turnouts the Easy Way


I’m not afraid of hard work. Never have been. But if I can work smarter, I’d rather do that. In this case, it’s long been a…dream, I suppose, to learn to build hand-laid turnouts. It always seemed like something only twelfth-level Jedi track masters could do.


But then I discovered Fast Tracks. In my last post I talked about using their tools, and at the risk of sounding like some sort of groupie, I’m going to talk about them again. Why? Well, for many reasons I suppose. First, it’s actually quite enjoyable if you like building models versus buying pre-built things. The tools work, and work well. The resulting track is fantastic, both in appearance and in operation. And they’re a small business trying to make it in today’s economy, so if I can help, I will. I’ve helped with my pocketbook, and now I’m helping by showing you it’s not hard at all to build your own track.


Being an engineer (computer, not railroad), I can respect what Tim Warris, the founder of Fast Tracks, has done. He’s a tool and die guy, so his work involves computer-aided design (CAD) along with taking those designs to machines that drill, grind, hone, route, and smooth metal or wood to implement his design. But he’s also a modeler who hand-lays track. He decided to build a fascinating layout, the concept for which is even more amazing since it’s real, or was.


I’m talking about the Central New Jersey Bronx Terminal. Now, if you’ve never heard of this particular line, you’re probably in good company. I certainly hadn’t. But a century ago, in the Bronx, New York, there was a 1x1 city block dedicated to freight cars that would arrive by barge. It had no other outside rail access. Inside this city block was a unique freight warehouse, with some of the most bizarre track I’ve even seen (see http://www.bronx-terminal.com/wp-content/uploads/1-Bronx2L.jpg). This was how citizens in the Bronx got fresh fruit, meat, and other consumer goods, or certainly at least one way.


From a modeling perspective, the problem is pretty apparent when you look at track like you see in Tim’s blog (the image link above). Now, I’ve never met Tim, but I suspect he’s a twelfth-level Jedi track master, and this level of complexity appealed to him. It is fascinating, to be sure, and I’d love nothing more than to buy him a beer to talk and learn more. How to actually build something like this?


Well, long story short, Tim combined his machining skills with his track skills and created “fixtures” for the various pieces of layout. One thing lead to another, and now he has an entire line of tools that you can use to create trackwork yourself. And since his tools are precision-machined, your trackwork comes out precise and repeatable. You get a winner every time, at least once you learn some basic skills, like soldering. I should also note these turnouts work with DC or DCC.
 

If you find this interesting at all, by all means visit his site at http://www.handlaidtrack.com/. He has online videos where he shows you, in detail, how the tools are used. He also describes how a turnout actually works and what dimensions are critical for good operation. This site is a treasure trove of information you will find difficult to locate elsewhere. If you want to build track, this is the place to go.


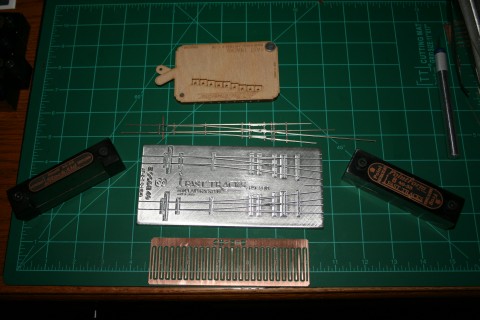
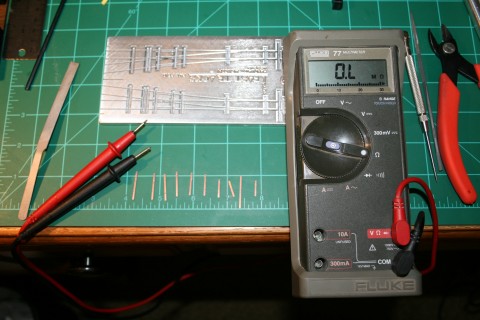
In any case, what’s the goal of this post? Why, to use the tools to build a Z scale #8 turnout. I need a small handful for the layout I’m building. I’ll also need several #6’s and curved turnouts and crossovers like I built in the previous post. The suite of tools I’ll use is shown here.


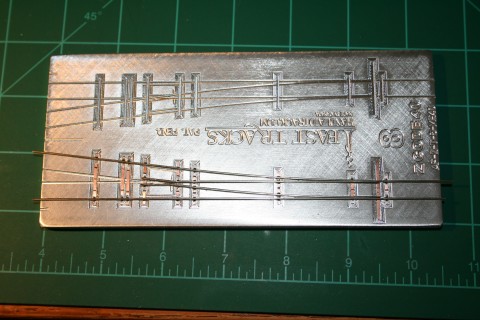
(Apologies for the poor photography…) What you see is the Z scale #8 fixture in the center, milled from high-grade aircraft aluminum. To its right is a PointForm tool, which is used to create the frog and points. To the left is a StockAid tool that helps with notching the stock rail. The copper fingers you see are printed circuit board ties (“PC ties”). We’ll cut these using the TieBreaker tool above the fixture. Actually, I would use the TieBreaker but this particular one is for the #6 turnouts. I’m waiting for my #8 TieBreaker to arrive in the mail. So I’ll cut the ties the old-fashioned way, which is to lay them into the fixture, mark the length, and cut/file to fit. But I’d use the TieBreaker if I had it! The turnout you see just above the fixture is what we’re going to produce. It’s typically referred to as a “skeleton.” The skeleton is glued to precision, laser-cut ties called QuickSticks. In short, the entire process is well thought out, and Fast Tracks provides tooling for each step.


Let’s begin.


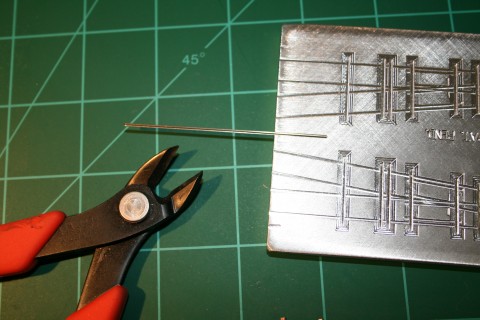
In this image it’s a bit hard to see, as the shiny aluminum glares back at the camera.


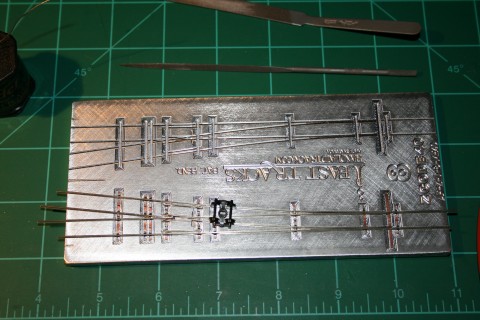
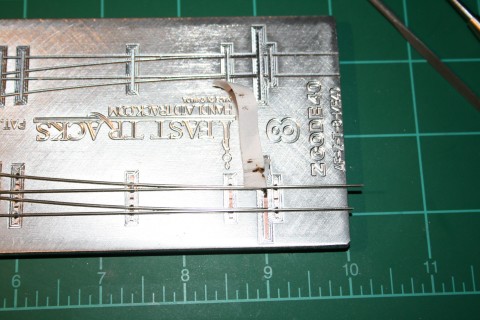
But I’ve cut some of the ties from the stringer (Tim refers to them as “frets” of ties), and I’m laying them into the slots for the right-hand turnout. I’m marking the length with the scribe, then cutting with the rail cutters and filing with the files. The goal here is to place a tie in every depression, where each tie is neatly trimmed and the ends are squared up. It’s important the ties lay flat, since the rail will be soldered onto the copper cladding. If the ties sit up in the fixture improperly, the rail won’t sit properly either.


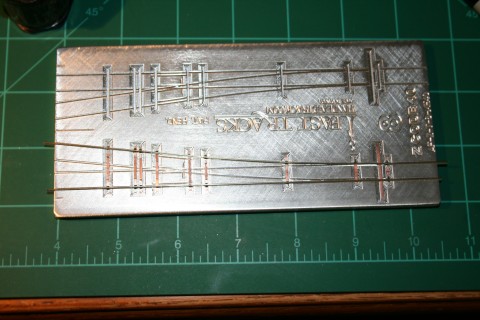
Of course, model locomotives operate using electrical current in the rails, so we have to be cognizant of shorts. Since the ties are completely clad in copper, we need to remove some of the copper so both rails don’t short out. In this image, although again somewhat hard to see (Z stuff is quite small, after all!), I’ve notched the copper cladding in the ties and verified there are no short circuits using my multi-meter.


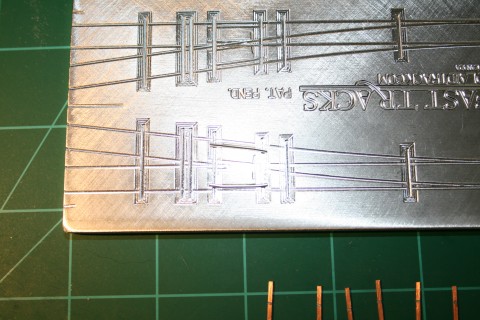
While I have the ties out, I’m going to fabricate the two guard rails. These are more than eye candy. As it happens, the guard rails are critical to how turnouts operate, so they’re not something to overlook or take lightly. In this case, the fixture has notches you use to cut rail to the appropriate length and then bend the edges to the proper angles.


Here I’ve laid the guard rails into the fixture to be completely sure they fit correctly. In HO I’d use an NMRA gauge later in the build to verify correct flangeway distances, but in this case, for Z scale, I rely on the fixture. Because of this I make doubly sure the guard rails are going to sit correctly on the ties.


With the guard rails fabricated, I’ll next assemble the frog rail. For this step I slip a length of rail into the PointForm tool. In the image you see the rail jutting out the right side at an angle. The end you can’t see also juts out, and it’s this end I’m going to file to a very sharp point. The PointForm tool is precision milled to give us the correct angle. For a #8 turnout, that would be 8 parts over and one part up, so to speak, or in other words a right triangle with a base of 8 units and a height of 1. Doing some basic trigonometry we find the angle to be 7.18 degrees. I’m not joking when I say that filing a piece of rail to that angle is a masterful job without this tool!


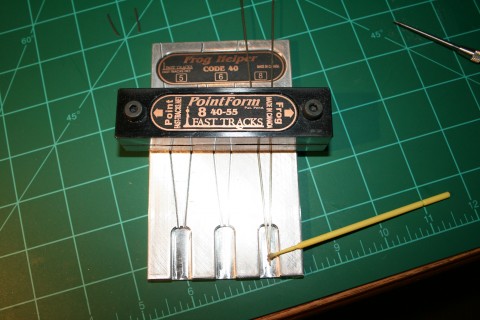
With both sides of the frog filed, I need to solder them together. I can do this in the fixture, but I use the Frog Helper tool instead. This tool gives me a little more room to solder and doesn’t sink the heat. I get a clean joint every time. Here you see I’ve placed the PointForm tool on the filed rails to secure them and have applied solder flux to the frog itself. I’ll heat this with my soldering iron and apply solder.


Once the solder hardens, I can pull the rails from the Frog Helper and admire a razor-sharp frog. No wheel in the world will get caught up on this frog!


With the frog soldered, I’ll set it aside for the moment and turn to the stock rails. These flank the turnout: one goes straight and one diverges. The switch point location dictates which direction the train takes, but to make that happen we have to notch the stock rails a bit so the points can snuggle up. If we don’t, the wheels will certainly catch the point rail and derail the locomotive, or certainly some car in the consist will complain. This notch is also something we need to be very precise about creating, and using the StockAid tool does just that.


Here I’ll file down the rail flange, leaving me with a perfect stock rail every time. Modelers used to use belt sanders, or files and vices, and Tim claims for every three he filed he might get one good one. This tool makes short work of the process and you get a perfect rail every time.


So what to do with these stock rails? Once filed, they go into the fixture and are soldered to the PC ties. Here you see the turnout begin to form.


Next I need to create the point and wing rails. I’ll use the PointForm tool to file the ends of the rail to a sharp edge that fits into the notch in the stock rail. I’ll then bend the point rail to form the wing, as you see here.


These are soldered to certain ties, but not to all since they need to move.


With the wing rails in place I can solder in the guard rails.


I’ll be careful here to make sure the guard rail sits squarely on the tie. If the rail is canted either way, it throws the geometry off, so I take care. But once those are in, I can fit the frog rail I created earlier. I’ll slide the frog to the left or right to get the best fit, which I check using a set of trucks. Generally the optimum location is seated as deeply into the wing rails as possible, but I always check.


I’ll solder this rail onto the ties as well as between the end of the frog and the wing rails, so it’s secure and won’t ride up on the roadbed. We don’t want the frog sticking up, just waiting to trip up an unsuspecting GP38.


So now the basic rail geometry is in place, but we still need to deal with the switch points. So I lift the end of the skeleton from the fixture and slip a small piece of paper between the straight point rail and the throwbar tie. The paper keeps me from inadvertently soldering the point to the stock rail. I’ll put down a nice ball of solder to make this a nice strong joint.


I can’t solder the other point rail to the throwbar tie in the fixture, so now we gently remove the skeleton and solder the other point rail. The width of a tie is the perfect spacer. And with this joint the skeleton is complete.


Now, I wire-brush the skeleton to remove solder flux residue. I also like to wipe it with lacquer thinner, as I know I’m going to eventually paint it. Once cleaned, I’ll apply contact cement to the underside of the rails and set it aside to dry.


I then grab a QuickStick and apply contact cement to the rail guides. For Z turnouts, I’ve learned to skip this for the ties near the throwbar tie since the gooey glue can glob out and interfere with the point rail movement. Instead, for those ties I use CA glue. For larger scales this isn’t such a problem, since you have wider rail and more tie material to work with. But for Z I’ve learned the glue globs just muck up the works in this sensitive area.


Once the contact cement has dried on both the skeleton and QuickStick, I can press them together to form the completed turnout. Beautiful!


I’ll place this on my desktop and put heavy weights on top of the rail to apply pressure as the glue sets, typically overnight. Once hardened, I snap the stringers off the QuickStick and admire the nearly completed turnout.


I say “nearly completed” because we need to electrically isolate the frog. To do that I’ll place the turnout in a small vice, and using a jeweler’s saw, I’ll cut the rails before and after the frog. When I secure the turnout to the roadbed, I’ll bring a wire up from underneath to supply the frog with the appropriate polarity.


I now have a hand-crafted turnout that exceeds the performance of any store-bought unit, and it’s one I’ll be proud to glue onto my roadbed and ballast. (If you’re wondering, I’ll use SG-90 micro-servo motors to actuate the turnouts…a post for another time.)


Continue reading
Recent Comments
Walter Smith
Looks great! This seem to be a lot of work to, but worth the time to do it! sorry there aren't more comments for all the hard work... Read More
Saturday, 20 May 2017 23:10
ZRailFan
It's OK. If anyone reads this and decides to give it a try, it's worth it. If not, then I still had fun doing it. Still trying to ... Read More
Monday, 10 July 2017 21:56
Stony
these are a lot of work, you really have to put a lot of time into getting everything correct. On my small layout, I used a polari... Read More
Monday, 10 July 2017 10:31
  15631 Hits
  5 Comments

Hand-Crafting a Curved Turnout


After having completed this, I’m not entirely sure if I was brave to try it or foolhardy. But I’ve always been amazed by hand-laid turnouts (and hand-laid track in general), so for this small Z layout, I’m hand-laying all of the track. In my previous posting, I was putting down the cork roadbed. With the exception of a small bit to go on the end of the yard, the cork is down:


The only modification I made from the last post was I bought an inexpensive clothes iron, and instead of sanding I turned the iron on high heat and melted the glue flat. Much easier!


So now I can turn to the track itself. Generally what is done is you secure the complex parts of the track to the roadbed, then you tie it all together with simple track work. So you build your turnouts, crossings, crossovers, and such things first, secure them, then bring connecting track to each.


In my case, I want a couple of elegant curved turnouts by the edge of the table. If hand-laid turnouts are cool, curved hand-laid turnouts are even more so. The problem I face is, whether some might consider it cheating or not, I use and swear by Fast Tracks templates (*). I have several for HO, and for HO they have a wide variety of offerings. Crossings, crossovers, turnouts of any and every kind. But for Z, they offer just straight turnouts, from #4 to #10. No crossings, crossovers, or (gasp!) curved turnouts. So I’m on my own.


Well, not entirely. I still have the wonderful tools Fast Tracks provides for creating the points and frogs, as well as the notches in the stock rails. I also have dimensional information. If I create a typical turnout and somehow translate that into a curved turnout, the general measurements will remain the same for the same sized turnout. Flangeways, for example, or general track gauge.


That’s a good thing because, for Z, we don’t have the otherwise invaluable NMRA check tool. I do have an NZT Products clearance gauge set, and I have a nice digital Vernier caliper, so I can take measurements from a (correct) turnout created in a Fast Tracks template and then translate that to the hand-laid turnout I’m building.


I also want to get into the world of 3D printing, so I bought a copy of TurboCAD. I feel like a 3-year old driving a Ferrari with that software, but I did manage to create a reasonable diagram I can use as underlayment and a guide for the rails. It’s crude, nothing like the fantastic track guides from Fast Tracks, but it’ll get the job done. It was gratifying I was able to lay down some precise circles and get a printed version.


Anyway, enough background. If you look at the previous figure, in the lower right-hand corner you see a track splitting off the inner main, heading for the hole (and eventual bridge). I decided to start with this turnout. The curve has a 10.75” radius, and as a guess I decided the diverging rail would have a 10.0” radius. Since I use #8 turnouts off the main, it’ll have to curve a bit more strongly once it splits off, but that’s OK. It’s a siding after all.


So in TurboCAD, I gave it my best shot:


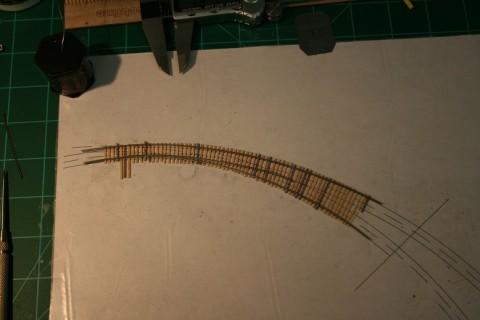
I printed this design out and sprayed the paper with a light coat of Krylon Easy-Tack. To this I overlaid wax paper, since I didn’t know if the ties would actually come off paper. Then I sprayed the wax paper with the Easy-Tack. This gives me a sticky surface onto which I can set ties yet still see rail guides underneath. (Next time I think I'll skip the wax paper...)


Speaking of ties, I cut individual turnout ties and mixed in Fast Tracks PC board ties in the appropriate spaces, which I then laid out on one of their Tie Racks. I used the branchline spacing since I knew I would be curving the tie set and would need space at the inner rail:


Once the ties were placed, I used a length of 1/8” painter’s tape to bind each tie, properly spaced, in preparation for moving onto my guide:


Here the ties have been transferred:


The Easy-Tack keeps them secured, and with the ties in place, I turned to creating the stock rails. I’m using Micro-Engineering Code 40 rail, which I file using a 10” mill file and a Fast Tracks Stock Aid tool. Here you see the stock rails in place along with the first point rail. The points and the frog are created using a Fast Tracks Code 40 PointForm tool:


After an embarrassing amount of time, I finally soldered all of the rails in place, checked flangeway spacing and track gauge in various places, and pulled the completed skeleton from the wax paper so I could wire brush the rail to clean off any remaining solder flux.


As I soldered rail, I verified spacing using my Vernier caliper and my mule turnout (created previously using the aforementioned Fast Tracks template). Once completed, I ran a set of trucks up and down the turnout, both ways, to see if I would have any issues at the frog. Everything seems fine, but we’ll know for sure once I run a locomotive and cars down the line. Fingers crossed.


I then applied contact glue to both the rail skeleton and the ties, allowed to dry, and then pressed the two pieces together. I re-verified gauge spacing, as I always do, even with typical turnouts built in a template. Once I was happy with alignment, I added weight to compress the rail and ties together and allowed the glue to set overnight. While I’d love nothing more than to peel this baby off the wax paper and admire the lines, I suspect all I’d do is tear the ties from the rail and generally make a mess. So the next morning I removed the weights, cut the paper around the ties (so I’d have less in the way), and then I carefully and slowly peeled the paper from the back of the ties.


I then gave the back of the ties a light wash of lacquer thinner to remove the sticky tack. While it’s true the ties will be glued to the roadbed, the underside of the throwbar tie was a gooey, sticky mess. Can’t have that, so I cleaned everything just to make sure.


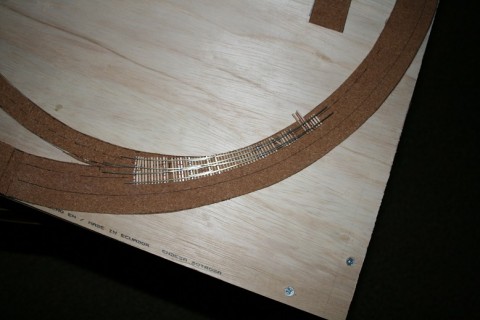
In this final image I’ve set the turnout in place. It’s not secured yet as I need to drill some holes for the throw wire and power. I also need to cut rails on either side of the frog for electrical isolation. But I wanted to show where the turnout will go, more or less (fine tuning and adjustments notwithstanding).


All in all, a gratifying project! Now all I need are three more just like it. (Actually two of those are a crossover, which I’ll save for another post…I’m waiting on some tie material…)


(*) Disclaimer: None of what I’ve written is meant to advertise for Fast Tracks. Rather, the tools are so well done and make turnout creation so much easier and repeatable it only makes sense to use the tools. As compared to RTR turnouts, on a per-turnout basis you’ll save money if you use them while creating higher quality and more effective trackwork.


Continue reading
Recent comment in this post
Walter Smith
Another great turnout! can't wait to see your finish layout after all is complete I know this is late way late and you probably ha... Read More
Saturday, 20 May 2017 23:14
  15015 Hits
  1 Comment

Roadbed Begins!


With my basic table completed, it was time to start laying out some roadbed in preparation for track. Since the table is 24” across, and I wanted my mainline curve radius to be as large as possible, the outer track would have a radius of 11.5”, giving me approximately a half inch at the edges. I suppose that’s not a lot of clearance given we have cats, but I wanted to use as much of the table top as possible.


But that’s not some standard size, and given it’s a dual mainline, I’d need an inner track curvature of 10.75” (using 0.75” separation between the tracks, which equates to 2” in HO scale, a pseudo-standard). Clearly pre-made track won't work, although I could use flex track.


But that’s not me. This layout isn’t so large that hand-laying track is so onerous, and I wanted to try it anyway. I’ve been building hand-laid turnouts in HO, so let’s see if I can translate that to Z. Too, I wanted some easement into the curve, so I can do just about anything when I lay the rail myself.


The question is then what roadbed to use? Cork seems most used in Z, and I’m happy to use it. Looking around I find a couple of vendors for pre-fabricated cork roadbed, but aside from the expense, the roadbed is pre-formed for vendor’s track. While that’s not so bad for straight, and possibly even curves, for turnouts it’s a bit problematic. Most of the formed cork I’ve seen includes area for the switch solenoid, and for hand-laid turnouts you don’t have movement above the table (I’m going to use micro-servo motors, another blog for a later date). Sure, I could trim the cork, but there is also thickness. All of the cork I looked at seemed too thick to me.


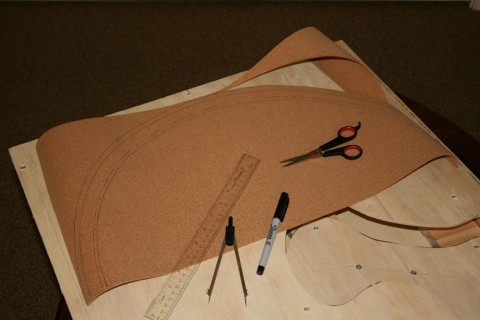
So I decided to use roll cork and cut my roadbed by hand. I wound up buying rolls of cork at Hobby Lobby. A 12” x 24” x 3/32” roll cost me $4.99 US, and that would handle a lot of Z track. (The SKU for that is 520064.)


I then needed to draw out where the track would go. I’ve seen a nice radius ruler, but I decided to make my own. While at Hobby Lobby I purchased an inexpensive clear ruler, and using my wire bits and a pin vice, I drilled center holes at 0”, 10.75”, and 11.5”. I also drilled holes that extend to the edge of the roadbed, at 10 7/16” and 12 1/8”. Those I kind of eyeballed. If the roadbed is a bit wide, I can trim. I don’t want it too narrow. But either way it’ll be covered with ballast, so absolute perfection isn’t required.


On the table I pinned the end of the ruler then drew the outline of the curve as well as (notional) track centerlines using the holes I drilled. I say “notional” because my lines didn’t quite square up. I think the cork shifted a little or my holes weren’t centered in the ruler. But since the width of the roadbed is consistent, I’m not concerned about the centerlines I drew initially. I’ll square those up when I lay down some track.


Once the pattern was drawn, I got out my scissors and cut!


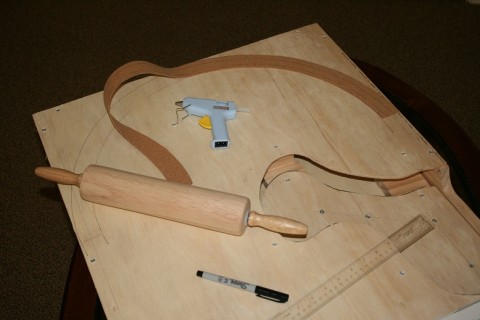
Here is the fully-cut section:


I then drew an outline on the table using the same pinned ruler approach. This gives me an idea where to apply hot glue. I fired up my glue gun and began securing the roadbed.


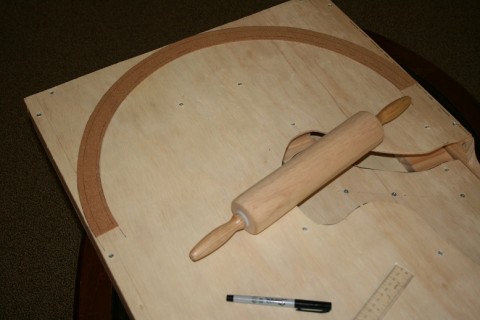
Here, I work with no more than about 6” to 8” of roadbed, so the glue doesn’t cool while I’m working. I apply some glue to the table and lay the cork over the glue. I then roll the roadbed with an inexpensive rolling pin I picked up at the grocery store. (My wife would kill me if I used hers, as it belonged to her grandmother.) I wanted to roll the cork as smooth as possible, but any small hills and valleys I’ll take care of when I sand the roadbed once it’s all completed. The track will cover a lot of imperfections as well. I’m really only concerned about any major hills and dales. However, here, in this case, I had none, so a light sanding and we’re gluing track.


While I had the unglued cork, I used it as a template and drew the outline on a separate piece of paper. Actually two such templates. I did this because I’m going to fabricate a curved turnout as well as a curved crossover, and I wanted to precisely match the curvature of the rails I expect to meet these fixtures. So I’ll save those and start on them once I have some tie material in. (I’ll need to custom-cut some tie material for the crossover.)


Eventually, working slowly around the curve, the cork is in place.


I’ll continue to cork the remainder of the layout in this manner. I have a small yard, and for that I’ll cork underneath all of the tracks in the yard. I’ll post some pictures once it’s done.


Continue reading
  27505 Hits
  0 Comments

Avoiding the Slinky Effect

I love Kadee couplers. They are the only couplers you can (generally) reliably uncouple without sticking your fingers on the cars. They appear more realistic to my eye as well.

But I’ve read where Z folks despise the “slinky” effect. They weren’t clear on just what this means, but I suspect it breaks down into two categories:

  • Initial consist startup

  • Consist in motion

Now, when starting a consist in motion you would expect the train to stretch, even in prototypical ops. There is play in the knuckles, and so when the engine begins to pull, all of the play is removed, lending the appearance that the train stretched. This is normal, and if the Micro-Trains (MTL) couplers demonstrate this, so much the better.

However, the second type of slinky effect isn’t desirable. (An exception would be a partially filled tank car, but let’s just remove all slink!) If an in-motion car or cars slink along, the car-to-car distance expanding and contracting based on the force of the coupler springs, what you see is truly annoying. What’s true today was true 30 years ago when I modeled as a teen.

There are a few things we can do to combat this. First, make sure your track is well laid, that all pieces are properly and snuggly fit into the rail joiners, that none are loose, and that all are clean and free of debris and trash. Anything on the tracks that increases rolling resistance is your enemy.

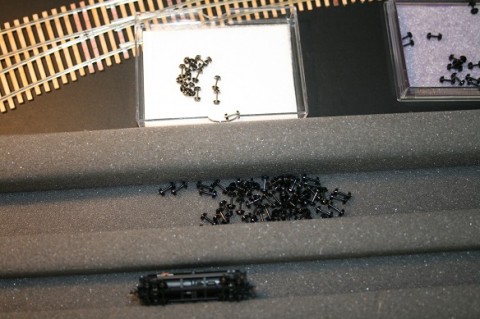
Second, replace the plastic (Delran?) wheel sets with metal:

I haven’t done any calculations because I don’t have material data sheets, but the rolling coefficient of friction between the plastic wheel and the metal rail reasonably has to exceed the coefficient for metal on metal, which is miniscule. I’ve replaced mine with “Uncle Will’s Full Throttle” darkened wheel sets, which you see in the image.

 But the more critical aspect has to be car weight. If you look at the NMRA specifications for the larger scales, all have a recommended car weight. This weight has a minimum value that increases by a set amount on a per-inch-of-car basis. In HO, for example, the minimum weight is 1 ounce, but you increase the car weight by one half ounce for every inch of car. If you have a 40’ boxcar, which in scale terms is 5.52”, then you add 2.76 ounces for a total of 3.76 ounces. This is a minimum value, but clearly we don’t want to overdo it either or we’ll have extremely short consists.

The reason for this minimum weight is light cars tend to derail on curves when coupled between heavier cars. They also tend to “eat it” on turnout frogs. You just can’t have a fluffball in the middle of your consist or things just don’t roll correctly.

In Z, our problem is there is no NMRA standard for Z gauge when it comes to car weight. So if we’re seeing this in-motion slinky effect, it’s probably in large part due to a car or cars being too light. Their weight can’t overcome the slight spring tension in the coupler, so they yank and pull, then get yanked and pulled, creating this unwanted “back and forth” effect. If you add rolling resistance to the equation, it makes things even worse. (Did I mention converting your wheel sets to metal?)

Well, shucks…no standard. So anything goes, right? Well, from the manufacturer’s standpoint, sure. But operationally, we need some guidance I would think.

So I created a spreadsheet and added the NMRA values for O through N scales, then from there extrapolated what I’d expect to see in Z gauge. The Z gauge numbers are completely fabricated on my part, but I carried through some equivalency values to check my work. The table below recreates that spreadsheet. The “Ratio” column is simply the scale, converted to a decimal number. 1:220 is really one divided by 220, or 0.0045. The starting weight and incremental weight are in ounces, with the incremental weight being added per inch of car length (as demonstrated previously).


Name Scale Ratio Start Wt. Pct. Wt. Pct. Ratio
O 1:48 0.0208 5.00 0.2000 0.004167
HO 1:87 0.0115 1.00 0.5000 0.011494
N 1:160 0.0063 0.50 0.3000 0.012500
Z 1:220 0.0045 0.35 0.2857 0.012987


To verify the Z gauge values were reasonable, at least until I empirically validate them, I calculated two derived values. The “percentage weight” is the incremental weight divided by the starting weight. Or in other words, how much weight are we adding as compared to the initial weight. The “percentage ratio” is the scale ratio (0.0045 for Z scale) divided by the initial weight. Here, we’re asking if the weight is reasonable for the scale.

Looking at the numbers, we see our Z percentage values are generally in line with the other scales. The percentage weight may be a bit high, but at some point we grow small enough in scale that the wheels cannot adequately overcome friction, the springs on the couplers are too strong, and so forth. So having a slightly larger percentage weight isn’t likely a bad thing. Maybe we couldn’t pull a hundred car consist, but that would be unlikely anyway, even with an MTL F7 (reputed to be strong pullers). Ask yourself which you prefer, longer but slinky consists or slightly shorter but not slinky consists.

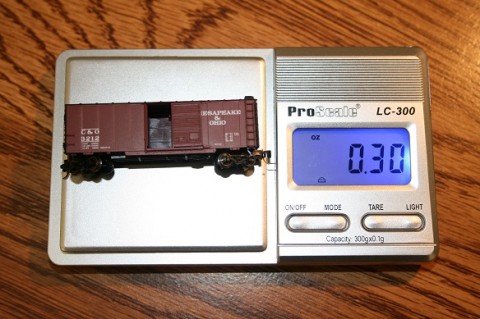
For grins I pulled a 40’ boxcar in Z scale and weighed it. Note this is with metal wheels, which I anticipate are slightly heavier than factory plastic:

Hmm. 0.30 ounces. That’s a bit light. If the car length is true to prototype, it should be 2.16” in length, so I should add about 0.25 ounces of weight to this car, and I’d do so half over each truck for balance. By the way, if you’re interested in the weight scale itself, I found it here:

Proscale LC300

It cost less than $10 US. It’ll become a handy tool, assuming my calculations (and hunches) are correct!

Finally, this is all mathematical/theoretical. Once I finish my layout I’ll do some testing and report back any adjustments. I have also read about knuckle modifications that may or may not be required as the weight of the consist increases. There is apparently casting flash that should be removed if you want the knuckle to fully grip its partner. Before I go to that kind of solution, I’ll try pulling some cars to see if they decouple on the track for no apparent reason. Those are some pretty small couplers to be filing if they don’t need to be filed!


Continue reading
Recent comment in this post
Walter Smith
Yes! I remember this post a while back and I bought the proscale LC300. Great piece of equipment. I needed it for the new milk car... Read More
Saturday, 20 May 2017 22:57
  16206 Hits
  1 Comment

It's Started!


  I hate to start out by apologizing, but I feel I must. This blog isn't about me but about things I come across while modeling. However, this first entry is actually a little about me as it may give insight as to why I find certain modeling aspects interesting. If it’s so much crap, forgive me. I’m no egomaniac.

 Anyway...

 30-some years ago, as a young teen, I was very "into" model railroading. I didn’t care so much for running trains around in circles. Rather, I was very interested in detailed modeling, especially structures. While I started in N gauge, I transferred over to HO scale since there were far more craftsman-style kits available as well as scratch-building materials. Interestingly, Z gauge was just recently introduced! (If that tells you about how old I am...)

 But then came football, girls, a Firebird (not a bad first car), college, military, then married with children. Long story short and half a life enjoyed, I recently joined my son at his college to help with calculus. On the way there, I spied a hobby shop. Curious, I stopped in, snooped around, and picked up a Walther's HO catalog.

 Well, the hobby is alive and well. I find DCC, Fast Tracks, and the depth of products to be particularly exciting. It's not a dying hobby. But some things do (and did) change. The loss of Floquil was like losing a best friend (happily we have Tru-Color!), and I was sad to find a lot of the famous craftsman manufacturers are gone. Campbell, Builders in Scale, and so forth. Fine Scale Miniatures is still here…happy day!

So while I've been scouring eBay, scarfing up un-built Fine Scale kits, I don't have room for a full-sized HO layout. What to do?

Aha! Z Gauge! That tiny little "new" gauge from "back in the day."

So I've been reading, thinking, and snapping up cars and engines here and there. I'm learning to buy things as soon as I find them, because tomorrow they may disappear. I'm a huge fan of Micro-Trains, as I have always been fond of Kadee couplers. So I have a small collection of cars and a F7 A/B set to pull them.

Problem is, I have no layout.

Then I picked up the March 2016 "Model Railroader." In there, they discussed 4x8' layouts, and one in particular caught my eye. The Virginia & Southern RR on page 56 looked quite intriguing. I loved the dual main with some simple/moderate yard work. I could position a nice bridge right up front and practice some rock and water modeling. And since I believe in hand-laid track, there is plenty here to keep me busy.
So right out to Home Depot I go and came back with some cut plywood and pine stringers. Doing some math, I know the conversion from HO scale to Z scale is 0.0045 / 0.115 (1:220 / 1:87), which is 0.39. Therefore, every measurement in HO can be reduced by 61%. If a layout is 4x8', in Z scale it would be roughly 2x3'. I splurged and made it 2x3.5'. :)

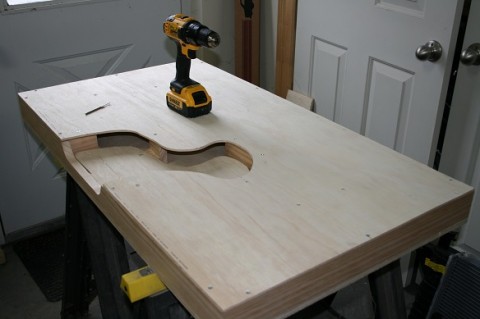
 Here are some shots in my shop where I've built the basic table. Once it's further along, I'll build a nice table to drop it into, using some oak or poplar. But for now, it's sanded plywood and pine. I'll hide switch machines inside the shell. The depressed area will be some sort of body of water...actually just an excuse to model some bridges. I'll likely do a blog about those before too long.

So I'm putting my mouth were my wallet is, so to speak, and have started a small layout for fun. I’m not the best at posting blog entries, but I'll try as it progresses.


(Papering over table to scribe initial trackwork.)

(Starting to create frame.)

(Framed and secured table.)


Continue reading
  12426 Hits
  0 Comments